Page 1 of 1
Second Range visit with new Wizard in .243
Posted: 23 Sep 2015 16:43
by retAFShooter
Well, another round at the range, after I had filed down the hammer facing to try and eliminate light strikes. I thought I had measured the protrusion at .042" or very close to it. But I still got 3 light strikes in 10 rounds. This is very frustrating, since I didn't bring the flat file to the range.

If my third try doesn't work, is there another solution? Did I read something about a different firing pin spring? Those rounds that I finally got down range were a fairly good group, at least for me. This light strike thing could ruin a good Deer Hunt
Re: Second Range visit with new Wizard in .243
Posted: 23 Sep 2015 17:10
by akuser47
You can try to shim the hammer spring to increase its tension to see if it will alieviat the light strikes.
Re: Second Range visit with new Wizard in .243
Posted: 23 Sep 2015 17:57
by Ranch Dog
Yes, it sure does look good! I do understand the frustration. I would try the shimming that AK mentioned vs. pulling it apart to get to the firing pin spring.
I stopped here on my 7.62x39 as I just had a couple of light strikes with a real fat hog in my sights. The next day the rifle was gone. Maybe I shouldn't have pulled the plug so quick but when it gets to you... you just are got and it ain't gon'na get better!
Re: Second Range visit with new Wizard in .243
Posted: 26 Sep 2015 06:38
by retAFShooter
is there a video or instructions on how to shim the hammer spring?
Re: Second Range visit with new Wizard in .243
Posted: 26 Sep 2015 13:09
by akuser47
Best way is to find or buy a steel punch and use steel shim stock from lowes or home depot you need a size that will support the spring and not fold into it and bind the hammer spring strut. Its time consuming and not fun to do. I punch out several discs of the stock then I pacman cut it enough to put around the strut under the spring then use plyers to pinch pacmans mouth shut around the strut just enough to keep it in place. I've also used smaller lock washers if you can find correct size to do this but they are harder to work with as the spring tempered steel doesn't want to cooperate. Its a put on and try endeavor as you need to add tension and then try it. Not sure on videos on this practice I don't think I'm the only one that's done this my uncle taught me.
Re: Second Range visit with new Wizard in .243
Posted: 30 Sep 2015 07:44
by retAFShooter
Ok, that's it for the Wizard. I'm putting it up for sale on a local forum. I tried one more round of filing on the hammer face, but still had one light strike in 20 rounds. I don't want to even fool with shimming the hammer spring. As Uncle Si would say "she gone".
Re: Second Range visit with new Wizard in .243
Posted: 30 Sep 2015 16:14
by Ranch Dog
retAFShooter wrote:Ok, that's it for the Wizard. I'm putting it up for sale on a local forum. I tried one more round of filing on the hammer face, but still had one light strike in 20 rounds. I don't want to even fool with shimming the hammer spring. As Uncle Si would say "she gone".
Don't blame you. When you're done, you're done!
Re: Second Range visit with new Wizard in .243
Posted: 18 Oct 2015 04:31
by retAFShooter
I'm not getting any offers for my Wizard because I told the truth about the light strikes. I may have to continue trying to fix this or just let it chill in the safe.
Re: Second Range visit with new Wizard in .243
Posted: 18 Oct 2015 07:10
by Ranch Dog
retAFShooter wrote:I'm not getting any offers for my Wizard because I told the truth about the light strikes. I may have to continue trying to fix this or just let it chill in the safe.
If you really want rid of it, the only other option is a deep discount.
Re: Second Range visit with new Wizard in .243
Posted: 19 Oct 2015 05:12
by klr
Are the internal parts the same as a H&R? I had the same problem on a Handi rifle that I cured by making a new trigger extension that holds the transfer bar in position slightly higher and longer.
Edit:
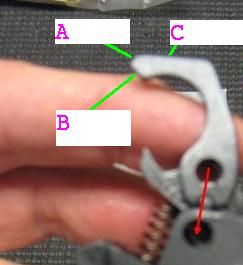
I took a look at RD's trigger thread and borrowed one of his pics. The Rossi trigger extension looks a lot like the H&R one.
So what I did was to make a new part. I added about .060 to faces A, B, and maybe C. I then assembled the parts outside of the receiver using the pins and holes, but no springs. I then filed the faces A, B, and maybe C until it would cock. I think I ended up with face A about .030 longer and the other two somewhat less. (Sorry about the "maybe C" part, but I really can't remember if I lengthened that face.)
This ended up holding the transfer bar up higher and longer. The transfer bar absolutely will not retract until I release the trigger. I now have solid primer strikes and 100% reliable ignition.
I think I made the part out of .050 mild steel. I figure it will hold up as long as the other junk steel H&R parts.
Hopefully this helps. When you get a misfire have you checked to see if the transfer bar is up until you release the trigger?